

A guide using sshfs for Relax and Recover (ReaR): bare-metal server backup & restore (or migrate) for Linux
Get a tailored bootable ISO and backup.tar.gz of other important files


Until I discovered this open source tool Relax and Recover, I wished I could do snapshots of some bare-metal dedicated servers, like if they're VMs, but they're not...
So, no virtualization, no easy snapshots. And therefore no easy way to fully recover a server the fastest the better ☹️ Sure, you can clone / do disk images, but what if you have multiple disks or a peculiar partition layout? Are you going to restore that manually while everything is on fire? 🔥 Well, at least is a plan.
For disaster recovery solutions in those cases of lack of server snapshots, I personally relied on automating my server setups from scratch (not bad) and doing daily backups of configurations and other big stuff. So I was confident to be able to restore a full server by "just" re-setup everything from a fresh OS install, executing some scripts and restoring some other data back. But this is far from convenient, depending on your exact recovery procedures (still quite a lot of manual work).
Relax-and-Recover (ReaR) can be a dream tool for some system administrators. It's a recovery and system migration utility for Linux servers that practically automates the backup and restoration of already running servers. The utility produces an ISO bootable image for that server and can restore from backup using it. 😍
You could also restore to a server with different hardware so it can be used as well as a migration tool. This may sound specially suited for those folks supporting legacy servers and having nightmares about the time when some machine(s) put in a corner will stop working and they'll have to put some services back on track (re-create the server setup). 🚩
Some concerns solved 😌
There are enterprise backup solutions for this. Using ReaR could save some money, but is it production ready? What about some spark of official support? Well, seems that RedHat, Ubuntu and Suse have documentation for using Relax and Recover on their distros and they include it.
Another concern about ReaR was that by reading the documentation, I had the feeling I don't know what really happens when you end having a bootable ISO image to restore your server, which is somehow size limited (2 or 4 GB for the ISO 9660 standard), considering that a full backup of essential server files could be larger. The thing is that the tool also makes a backup.tar.gz file of any other data that is not essential to boot, so that file can be as large as you need (and automatically transferred along with the ISO file to another location). In fact the tool (ReaR) provides a config. variable named ISO_FILE_SIZE_LIMIT, I guess for a reason. It defaults to 2 GiB (2147483648) and you can read the explanation in depth at /usr/share/rear/conf/default.conf
Ok but, what really happens when I really need to restore the server? Can I just boot from the custom ISO (USB, DVD), and then plug a USB with backup.tar.gz and the tool will take it? Like, for example, the product Acronis True Image backup do? You boot from the "emergency USB stick", then plug the other big USB with the "big data" to restore from it? Well, is something like that, and it's good. Keep reading. ReaR supports an ISO which is customized for each server's backup, but even PXE, OBDR tape and more is supported.
What about drives or disks layout? I've tested several drives, LVM volumes, EXT4 and XFS... and they're recreated just fine. Really nice. This is what the tool does: handles this stuff. It tries hard to re-assemble the same disks layout, partitions, software RAID, etc. And as long you have equal or bigger drives on the restore hardware, it will be pretty automatic. If not, it will ask questions and lets you take control.
What about network cards? Well, it's fantastic seeing the tool recognizing you're restoring to the very same hardware or not. Had two network cards? Detected. Adapt to it, reconfigure, etc. Is it the very same hardware, just rolling back for some reason? Perfect, go ahead.
The final concern is when you don't have physical access to the bare-metal hardware. Like, who is going to plug the USB with the ISO image AND the other USB with some extra backup files? Well, the extra backup.tar.gz [big] file can be accessed via USB, or other methods, like network via several protocols (nfs, sshfs, Samba...) and if your dedicated server provider is good enough, you'll be able to have a KVM (or "remote hands") that supports having an ISO mounted via some network protocol. You just have to provide access to the ISO for recovery. Some other providers could offer manually putting your ISO into an USB drive and have it plugged for you.
Using sshfs to transfer the ISO and backup
Most of the HowTo's and tutorials about Relax and Recover out there give examples using NFS (Network File System) or Samba to remotely save the ISO and the extra file backup.tar.gz.
We're going to use "sshfs" which should be safer by default (ensuring encryption) and easier to setup if you're used to password[less] ssh connections and have a spare box to test and receive there some server's backup ISO and tar.gz.
Install ReaR from github to get latest version
So, in this guide the plan is to save the ISO and extra backup files via sshfs (so we only need a directory in some other server that can serve ssh and let an user connect to it) and the tool will take care of mounting our "sshfs shared folder".
Some pre-requisites in the server we want to backup.
Assuming RHEL / CentOS Linux here:
sudo yum install pigz sshfs genisoimage syslinux asciidoc xmlto
Under some Ubuntu Linux, I just needed:
sudo apt-get install pigz sshfs genisoimage syslinux isolinux
Next, clone the ReaR repo to get the latest version (2.6.0 as of this writing) since we want the latest patches and bugfixes.
git clone https://github.com/rear/rear
cd rear
sudo make install
Everything should be fine, last step being "Installing documentation".
Preparing the backup config.
Once ReaR is installed we can now prepare a new config file, which should be called 'local.conf' or 'site.conf' (find configuration at the full ReaR documentation) or read exhaustive info for each variable at /usr/share/rear/conf/default.conf
Let's add stuff to the file called: /etc/rear/local.conf
# exclude dirs from backup, note is a bash array, spaces, not commas
BACKUP_PROG_EXCLUDE=("${BACKUP_PROG_EXCLUDE[@]}" '/media' '/var/tmp' '/var/crash' '/some/path/to/exclude/*' '/other/stuff/*.bz2')

# Output defined to ISO image
OUTPUT=ISO
# Location to copy ISO image to
OUTPUT_URL=sshfs://myuser@remotehost/home/myuser/rear-backups/
# Backup to ISO uses the NETFS workflow
BACKUP=NETFS
# In this case we want the backup.tar.gz file in the same location as ISO
BACKUP_URL=sshfs://myuser@remotehost/home/myuser/rear-backups/

TMPDIR=/rear/_tmp

CLONE_ALL_USERS_GROUPS=yes

# Set pigz for tar, instead of default "--gzip" so we use all CPU cores
BACKUP_PROG_COMPRESS_OPTIONS=( --use-compress-program=pigz )
# Make sure the rescue ISO includes the pigz binary or restore will fail
REQUIRED_PROGS=("${REQUIRED_PROGS[@]}" 'pigz')

# include private keys in the rescue ISO
SSH_FILES=yes
# include private keys without passphrase in the rescue ISO
SSH_UNPROTECTED_PRIVATE_KEYS=yes
This config file needs the syntax like VARIABLE=value (no spaces between '=').
You have examples at /usr/share/rear/conf/examples/ like RHEL7-ISO-Oracle-example.conf or rescue-and-backup-on-same-ISO-image-example.conf, but I would test that you can really recover from the later.
So about the config file, we can add stuff to exclude from the backup to BACKUP_PROG_EXCLUDE after /var/crash, don't mess with the default values. I like to do ncdu / as root to easily check for those big directories on the server that probably I already backup with other methods, so it's ok to exclude them to avoid making the basic ISO+BACKUP larger than really needed. There will be cases where you want to backup the working system, not really a full point-in-time snapshot with all user / app data that could be restored from other locations.
Be sure to create the directory /rear/_tmp (as per the example config.)
sudo mkdir -p /rear/_tmp
Also be sure to:
- Have created the directory
/home/myuser/rear-backups/on the remote server (as per the example) - Have installed the sshfs package (done at install step) at the server you want to backup so we can access the remote host using sshfs.
Now, say our remotehost has a non-standard port for ssh (ie. 5522) and/or we want to provide a private key so we're not asked for a password each time ReaR tries to sshfs mount the remotehost directory. We could put this addendum to the ssh client configuration file:
/etc/ssh/ssh_config
Host remotehost
        Port 5522
        ServerAliveInterval 15
        IdentityFile /path/to/rear_private_key
        # only send this identity
        IdentitiesOnly yes
To create a new rear_private_key (without passphrase) just do:
ssh-keygen -b 4096 -f ~/.ssh/rear_private_key -q -P ""
And remember putting the public key contents on .ssh/authorized_keys of the remotehost
💡 If you want your private key(s) being stored on the rescue ISO, you have to explicitly say it by configuration in /etc/rear/local.conf:
# To access other systems via root's passphrase-protected SSH private keys
# present on the original system, set SSH_FILES=yes
# To access other systems via root's protected and unprotected SSH private keys
# present on the original system, set SSH_FILES=yes and SSH_UNPROTECTED_PRIVATE_KEYS=yes
Launching the backup
Ready? Let's see if ReaR can write a custom ISO for your server and make a backup.tar.gz of other data you didn't exclude, and transfer it to the remote server you defined. Remember to have checked /etc/rear/local.conf to exclude any BIG directories that could be already being backed up or we just want to avoid for testing, or whatever.
As root:
rear -d mkbackup
💡 Extra messages are very helpful when using rear -d option.
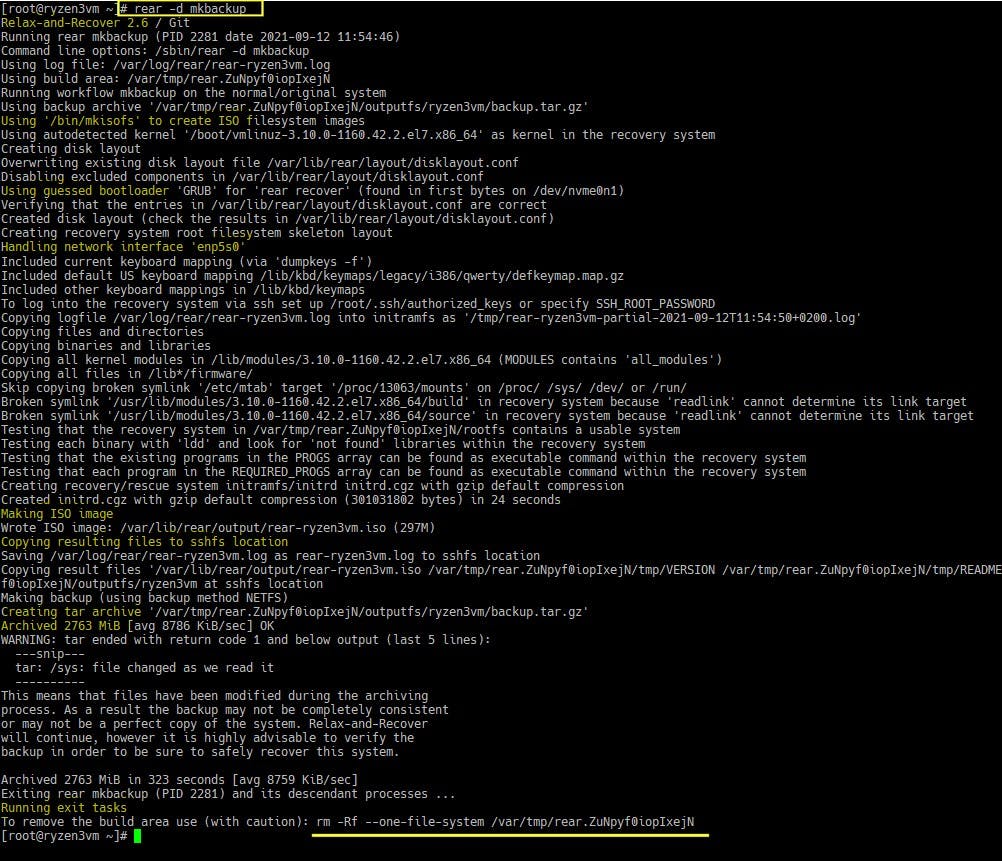
We should see if everything goes right: ReaR trying to create the ISO bootable image, trying to connect via sshfs and saving there the ISO and the backup files, etc. If something fails, the extra debug messages will help to troubleshoot so we can fix and repeat the command.
If everything's alright, then, as per our example, a new directory named the server's hostname should have been created at the remotehost: /home/myuser/rear-backups/<hostname> and will contain our life-saving bootable ISO and backup.tar.gz files for that particular server, and some extra files like logs.
💡 Interesting from the ReaR documentation: the rear checklayout command will tell you if the most recent backup needs to be refreshed (done again) because of LVM changes, filesystem(s) resized, etc. The command returns 0 if your system is OK from last backup. A return code of 1 should lead to a red light in your monitoring screen because a new rescue image is needed [since the disks layout has changed].
Troubleshooting the sshfs connection
If you're having problems making work the sshfs connection, use the following to debug the failing sshfs mount command:
sshfs -odebug,sshfs_debug,loglevel=debug myuser@remotehost...
Usually there are problems with connection parameters or authentication, not having an internet connection (on recover) or because you think the recovery machine should connect to the hostname but cannot (ping, check and edit /etc/hosts, etc).
Restoring the server from ISO (or migrate or test under a VM)
The nice thing here is being able to "test" the recovery by using your favorite virtualization software (like Virtual Box) so you can boot the custom ISO generated by ReaR and just getting access to the backup.tar.gz file, etc. So you can prepare some "virtual scenario" with some drives that emulate the recovery (hardware) situation.
💡 Remember to set "Bridged adapter" for network card in your VM if you need it.
💡 Remember you can set a new VM with a number of disks attached to it, say drives that match in size those on the server (or bigger ones), for the sake of testing a recovery. If you make them "dynamically allocated", it's easy stuff to test without worrying for space. As long as you have the same number of disks, you won't need to manually edit any "drive mapping".
The goal is to easily view and test what would happen on the event of a recovery/migration using ReaR on some virtualised hardware, but of course would be better if you can test it on bare-metal hardware that deviates from the original or is indeed the original hardware (but different VLAN for example?)...
Step 1) Boot from ISO, a menu should appear:

Step 2) Select "Recover 'hostname'" to manually restore
Step 3) Login as? root (no password is required unless you set one via config at ReaR)

Step 4) Once logged into "recovery terminal":
- Check you have internet / network access (to access the backup.tar.gz file)
- Check the contents of those files, they're there!
/etc/rear/local.conf,/etc/ssh/ssh_config/and check the file list under/root/.ssh
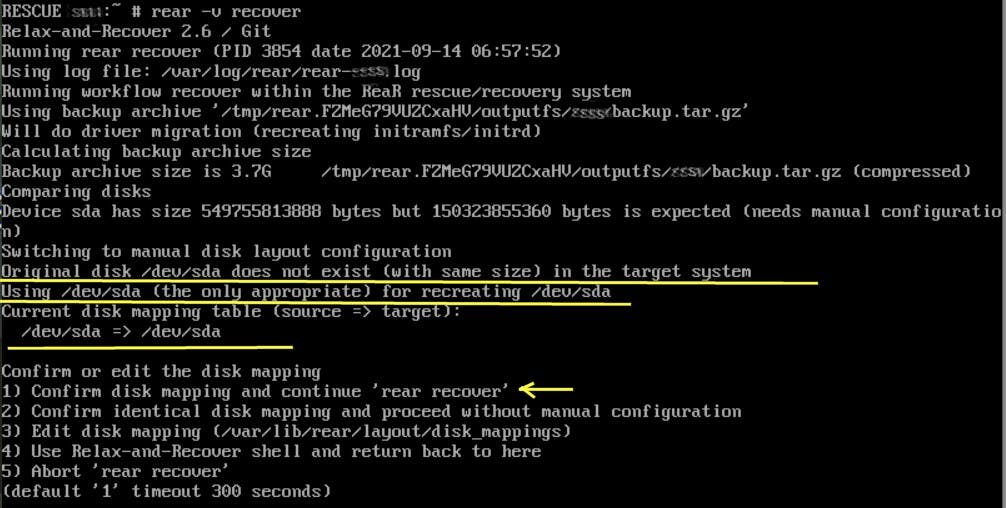
Step 5) If you're ready, execute this command to begin the restore process with helpful output in case of problems:
rear -v recover
💡 The -v argument will output helpful extra messages.
By default, ReaR will try to recover the server, recreate disk and partition layout, etc. and restore from backup.tar.gz, using the same method used to transfer the backup (sshfs in our case). You can see that, inside the recovery terminal/console, you have your custom /etc/ssh/ssh_config there (in case you modified it) to try to access your remote server via sshfs.
💡 The only caveat is if you didn't use SSH_FILES=yes and SSH_UNPROTECTED_PRIVATE_KEYS=yes in the backup's config file, you won't have the private key there to be used, so you'll be asked for a password, or you could copy your private key over using scp for example. Note that for password to work you may need to enable PasswordAuthentication at the remote server (/etc/ssh/sshd_config).
Anyway, you could change the method to access backup.tar.gz by just editing /etc/rear/local.conf that is available at the recover terminal (BACKUP_URL). So far so good (refer to the ReaR documentation for the other methods to access your backup.tar.gz by editing BACKUP_URL, etc). You only have to make it accessible.
🙂 And that's it: if everything goes well, you'll be instructed to reboot the server and it will try to use the same network cards / network config (DHCP or not), your disks layout and partitions should be ok and you should be happy 😀
Troubleshooting not having internet once in ReaR rescue terminal
If the server is DHCP network configured, usually no problem, and normally under CentOS everything's ok.
Under a particular Ubuntu recovery test, I had to manually set the network, doing something like this (ip addr to get connection name, in this case enp0s3), :
ip addr
ip addr flush enp0s3
ip addr add 192.168.0.20/24 dev enp0s3
ip link set dev enp0s3 up
ip route add default via 192.168.0.1
# ping something to test connection, check /etc/hosts, /etc/resolv.conf for DNS, etc.
Final words
Hoping this helps some people to try Relax and Recover. It's a really brilliant tool 💎 composed of very smart bash scripts that do quite some magic on making a recoverable snapshot of a non-virtualized server.
I praise the authors for this tool, but as you may imagine, it's possible to encounter particularities on recovery and tricky rabbit holes they try to document, fix and improve (non-UEFI to UEFI boot recoveries, drivers on new hardware, etc). But overall I think that for my pretty basic testing on several circumstances, ReaR is impressive and very convenient. I'm just sharing the love 🧡 😉
Thanks for the comments on Reddit .
Edits:
- Added references to ISO 9660 spec. about ISO image file sizes.
- Added SSH_FILES=yes and SSH_UNPROTECTED_PRIVATE_KEYS=yes to configuration so the rescue image includes private keys.
- Added use of pigz instead of gzip for compression so we use all CPU cores, via config BACKUP_PROG_COMPRESS_OPTIONS and REQUIRED_PROGS
- Added demo screenshots